Evaluating Heat Pump Reversing Valve Performance Before Winter
The Hidden Risk of an 8-Month Cooling Season for Your Heat Pump
Your air conditioner likely ran flawlessly through the brutal summer, but when that first late-fall cold snap hits, you might quickly realize why evaluating heat pump reversing valve performance before winter is an absolute necessity. Instead of a comforting blanket of warm air, your vents might suddenly blow a freezing breeze directly into your living room. This frustrating scenario happens because a critical internal component has spent the better part of a year sitting completely motionless, and now it refuses to budge.
To keep your equipment running reliably, understanding how this component fits into your overall residential heating systems is just as critical as scheduling proactive heat pump repair and maintenance.
In our years serving the San Antonio area, our team at Reliabee has seen firsthand how the local climate presents a unique challenge for HVAC equipment. Heat pumps here often run in a continuous, heavy-duty cooling cycle for up to eight months straight. From early spring through late autumn, the system operates in a single mode. Homeowners naturally assume that when the weather finally turns, they can simply flip their thermostat to "heat" and the system will seamlessly transition. Unfortunately, mechanical parts that sit dormant for extended periods are prone to seizing up.
This is exactly why relying on hope is a poor winter strategy. The September pre-heating transition is the ideal window to ensure your system is mechanically prepared for freezing temperatures. A professional pre-season diagnostic test goes far beyond changing a filter; it specifically targets dormant heating components to ensure the physical shift from cooling to heating actually occurs. By addressing this before the first real Texas cold front arrives, you protect your home from sudden, uncomfortable heating failures.
The Mechanics of the Reversing Valve: Shifting from Cooling to Heating
To understand why your system might fail to heat your home, you have to understand the defining component of a heat pump: the reversing valve. This four-way brass valve is the only mechanical difference between a standard air conditioner and a heat pump. Its sole job is to dictate the directional flow of high-pressure refrigerant through your system.
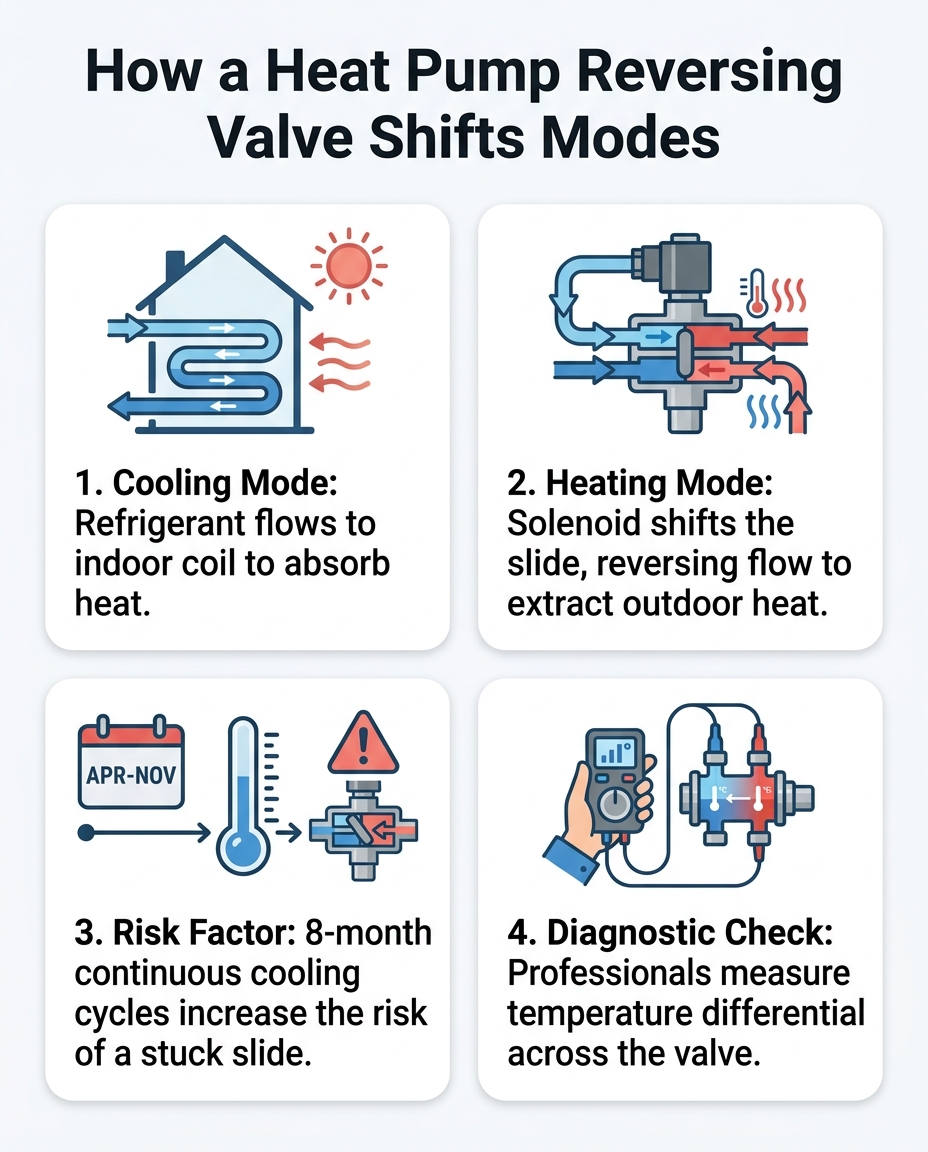
Inside the brass casing of the valve sits a specialized sliding mechanism. When your thermostat calls for a mode change, a small electromagnetic component called a solenoid coil receives a 24-volt electrical signal. This coil creates a magnetic field that moves a tiny pilot valve. The pilot valve then uses the compressor's own immense pressure differentials to physically push the main internal slide from one side of the brass tube to the other.
This physical movement relies heavily on proper internal lubrication and exact pressure balances to function smoothly. If the slide cannot move, the refrigerant cannot reverse direction, and the system remains locked in its previous mode. Professionals verify this internal movement by measuring the precise temperature differential across the valve, ensuring the mechanical shift is complete.
How Refrigerant Flow Determines System Mode
The position of that internal slide completely alters how your heat pump interacts with the air inside and outside your home. The process is a marvel of thermodynamics, but it requires the reversing valve to function flawlessly.
• Cooling Mode — Slide Position: Default (Unenergized in most systems) — Refrigerant Flow Path: Directs hot compressor discharge gas to the outdoor coil. — Resulting Action: Releases heat outdoors; indoor coil absorbs heat from your home.
• Heating Mode — Slide Position: Shifted (Energized) — Refrigerant Flow Path: Directs hot compressor discharge gas to the indoor coil. — Resulting Action: Releases heat indoors; outdoor coil absorbs ambient heat from outside air.
When the valve shifts successfully, the indoor and outdoor coils effectively swap jobs. If the valve is compromised, that thermodynamic swap never takes place, leaving you shivering indoors while your outdoor unit attempts to warm up the neighborhood.
Why Reversing Valves Seize After Prolonged Texas Summers
Mechanical failures in heat pumps rarely happen overnight; they are usually the result of prolonged, cumulative stress. In the case of the reversing valve, the primary enemy is simple inactivity. "Use it or lose it" applies directly to the internal sliding mechanism.
During an extended Texas cooling season, the valve sits completely motionless in the cooling position. Over these eight months, the internal refrigerant oil can begin to degrade or settle. Minor debris, microscopic metal shavings from the compressor, or carbon buildup can accumulate around the edges of the slide. When the thermostat finally sends the signal to switch to heating, the slide is too stiff or gummed up to overcome the physical friction, leaving the valve stuck.
A pattern we see often during the first harsh winter cold front is a frantic call from a homeowner who urgently needs heat, only to find their system blowing cold air. Just last season, one of our lead technicians responded to this exact scenario. After diagnosing a seized valve, they explained the underlying mechanical problem, replaced the faulty component, and fully restored the family's heating performance just in time. This scenario is incredibly common when dormant components are ignored.
Common reasons reversing valves fail to shift:
• Degraded lubrication: Refrigerant oil breaks down over long, hot summers, increasing internal friction.
• Internal debris: Contaminants in the refrigerant line lodge against the slide mechanism.
• Loss of pressure: A failing compressor cannot generate the pressure differential required to push the slide.
• Solenoid failure: The electrical coil burns out and cannot magnetize the pilot valve.
A dangerous misconception among homeowners is that you can fix a stuck valve by tapping it with a hammer or wrench. Never strike your reversing valve. The brass casing is relatively soft, and even a minor dent will permanently trap the internal slide, turning a repairable sticking issue into a mandatory, highly complex valve replacement. Instead, focusing on preventing unexpected heater breakdowns through proper maintenance during the September pre-heating transition is the smartest approach.
Professional Diagnostics: Measuring Temperature Differential Across the Valve
Because the internal slide is hidden inside a sealed brass tube, you cannot simply look at a reversing valve to see if it is working. Licensed HVAC technicians must use indirect, highly accurate diagnostic methods to assess the valve's internal sealing and shifting capability.
The most reliable method is measuring the temperature differential across the valve. A reversing valve has four copper tubes connected to it: one from the compressor discharge, one to the compressor suction, one to the indoor coil, and one to the outdoor coil. By measuring the exact temperatures of these specific lines, a technician can map the internal flow of refrigerant.
The professional diagnostic process involves:
1. System Stabilization: The technician runs the heat pump for 15 to 20 minutes to ensure refrigerant pressures and temperatures have fully equalized.
2. Probe Placement: Highly sensitive digital temperature probes are clamped to the true suction line and the suction line returning from the evaporator.
3. Reading the Differential: The technician compares the two temperatures. A healthy valve will show a very tight temperature differential across the valve, usually within a few degrees.
4. Confirming the Shift: If the temperature difference is too wide, it indicates that high-pressure, superheated gas is bleeding past a partially stuck slide into the suction side, destroying the system's heating efficiency.
Interpreting Diagnostic Readings
In our experience troubleshooting San Antonio tract homes and custom builds alike, these advanced gauges and temperature probes take the guesswork out of heat pump repairs. During a recent fall service visit, one of our customers was experiencing a frustrating heating issue. Our technician used this exact temperature differential method to pinpoint the failure, thoroughly explained the issue in simple terms, and resolved the problem correctly on the spot.
At Reliabee, our rigorous seasonal diagnostics always include this exact temperature differential testing across the valve. We've learned over the years that we don't just turn the heater on to see if it blows warm air; we mathematically verify that the internal seals are holding tight. This level of precision is what prevents emergency no-heat calls when the temperature drops below freezing.
Verifying Solenoid Coil Integrity Without Dangerous DIY Electrical Tests
When a heat pump refuses to switch modes, the problem isn't always mechanical. Sometimes, the physical slide inside the valve is perfectly fine, but the electrical solenoid coil that tells it to move has failed. Differentiating between a mechanical failure and an electrical failure is a critical part of the diagnostic process.
The solenoid coil is a small, cylindrical electromagnet that sits over the pilot valve. If the tiny wires inside this coil short out or break, the coil cannot create the magnetic field necessary to initiate the shift. Technicians test this by checking for proper voltage reaching the coil from the control board, and by measuring the electrical resistance (ohms) of the coil itself. If the coil is receiving 24 volts but has infinite resistance, the coil is dead. Fortunately, a bad coil can usually be replaced without removing the entire brass reversing valve, which saves significant time and effort.
A strict warning for homeowners: You should never attempt DIY electrical testing on your HVAC system. Heat pumps operate on extremely dangerous 240-volt high-voltage circuits, while the control wiring operates on sensitive 24-volt circuits. One slip of a multimeter probe can cause a severe electrical shock, or instantly fry your system's expensive control board.
If you suspect an electrical failure because your system is completely unresponsive or making rapid clicking noises, the safest action is to step away from the equipment and call for emergency HVAC service. A licensed professional will safely check the voltage, confirm the temperature differential across the valve, and determine exactly which component is at fault.
Timing Your Pre-Season Tune-Up for the September Transition
Timing is everything when it comes to preventative maintenance. If you wait until November to turn on your heat for the first time, you are gambling with your family's comfort. Our team typically recommends the September pre-heating transition as the absolute best time to evaluate your heat pump's dormant components.
Identifying a stuck reversing valve early in the fall means parts are readily available, and our technicians aren't bogged down with emergency winter calls. Our team typically sees that homeowners who book early avoid the stress of unexpected breakdowns. During a recent routine seasonal visit, a customer who scheduled their September maintenance not only got a clean bill of health for their reversing valve but also received actionable tips from our technicians on energy saving and prolonging their unit's life, resulting in a pleasant and stress-free experience. That peace of mind is exactly what a timely tune-up provides.
A comprehensive pre-season diagnostic includes:
• Reversing valve shift testing: Forcing the system into heating mode to verify mechanical movement.
• Defrost control board evaluation: Ensuring the system can melt ice off the outdoor coil during freezing weather.
• Auxiliary heat sequencing: Testing the backup electric heat strips to ensure they activate properly when the heat pump needs help.
• Refrigerant charge verification: Checking pressures to ensure the compressor can generate enough force to move the reversing valve slide.
• Electrical connection tightening: Preventing loose wires from causing intermittent solenoid failures.
Preventative testing is the only proven way to ensure your system is ready for the first freeze. By enrolling in a seasonal maintenance plan, you guarantee that these complex mechanical and electrical checks are performed before the weather turns hostile. Additionally, evaluating your system in the fall gives you ample time to check if generic federal tax credits or local utility incentive programs may apply to qualifying high-efficiency heat pump upgrades, though we always recommend verifying current programs directly with your utility or a tax professional.
Frequently Asked Questions About Heat Pump Reversing Valves
Why is my heat pump stuck in cooling mode?
Your heat pump is likely stuck in cooling mode because the reversing valve's internal slide mechanism has seized, or the electrical solenoid coil has failed. After running in a continuous cooling cycle for months, the internal lubrication can degrade, causing the slide to stick. A professional can determine if the issue is a mechanical jam or a dead electrical component.
How do professionals test a heat pump reversing valve?
Professionals test a reversing valve by measuring the temperature differential across the valve's four copper lines. By using highly sensitive digital thermometers, technicians can map the internal flow of refrigerant to see if high-pressure gas is bleeding past a stuck slide. They also safely test the solenoid coil for proper voltage and resistance.
Can a heat pump reversing valve be unstuck?
Sometimes, a technician can free a slightly stuck valve by rapidly cycling the system between heating and cooling modes to build pressure, but this is often a temporary fix. You should never attempt to unstick the valve by hitting it with a tool, as denting the brass casing will permanently ruin the component. If a valve is severely seized, the entire assembly must be replaced.
How do you test a reversing valve solenoid?
Testing a reversing valve solenoid involves using a multimeter to check for 24-volt power coming from the control board and measuring the resistance (ohms) across the coil itself. Because this involves working near high-voltage components and sensitive circuit boards, this testing must only be performed by a licensed HVAC technician to prevent electrical shock or system damage.
What are the most common signs of a bad reversing valve?
The most obvious sign of a bad reversing valve is a heat pump that blows cold air when set to heat, or warm air when set to cool. You might also notice a distinct hissing sound coming from the outdoor unit, which indicates refrigerant is bleeding backward through a partially stuck internal slide. Reduced heating capacity and unusually high energy bills are also strong indicators of valve failure.
Guaranteeing Winter Reliability with Professional Diagnostics
Evaluating heat pump reversing valve performance before winter is not just a technical formality; it is the ultimate safeguard for your home's comfort. A component that has spent eight straight months locked in a cooling position requires specific, safe diagnostic tests to ensure its internal slide mechanism hasn't seized under the stress of the Texas heat.
Understanding the intricate mechanics of this vital valve helps highlight exactly why professional maintenance is so valuable. When you prioritize the September pre-heating transition, you give your system the best possible chance to perform flawlessly. Schedule your comprehensive fall testing today to ensure your heat pump will switch modes seamlessly, providing reliable, efficient warmth the moment you need it.

Ready to Transform Your Home?